
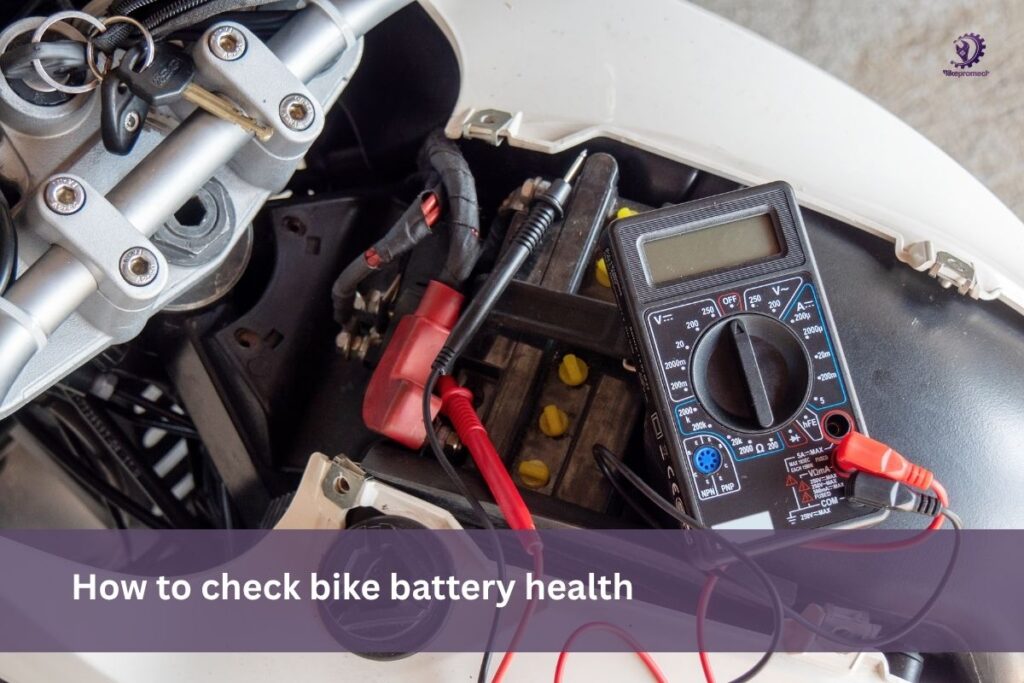
The fastest way to check your bike battery’s health is with a multimeter: a healthy 12V battery should read 12.4V–12.9V at rest (engine off, bike unused for a few hours) and stay above 9.6V while cranking the starter. Anything below 12.2V at rest suggests the battery is discharged or aging, and a voltage that collapses sharply under cranking load usually means it can no longer deliver enough current, even if it reads fine at rest.
This guide covers the full at-home check — multimeter testing, a load test, visual inspection, and how to interpret what you find — so you know whether your battery needs charging, replacing, or is simply fine.
What You’ll Need
- A basic digital multimeter (available for ₹300–₹800, and reusable for other electrical checks)
- A well-lit area to inspect terminals and casing
- Your bike’s owner’s manual, to confirm your battery’s rated voltage and type
Step 1: Visual Inspection (2 Minutes)
Before testing voltage, check the battery physically — this alone catches a surprising number of issues.
- Terminals: Look for white, blue, or greenish corrosion buildup around the terminal posts. Corrosion adds resistance and can cause starting issues even with a perfectly good battery underneath.
- Casing: Check for swelling, cracks, or bulging — a swollen battery case is a sign of internal damage or overcharging and should be replaced, not just charged.
- Leakage: Look for any signs of fluid leakage around the base, especially on older lead-acid batteries.
- Connections: Confirm both terminal connections are snug — a loose connection can mimic the symptoms of a dead battery entirely.
If you see swelling, cracking, or leakage, stop here — the battery needs replacement regardless of what a voltage test shows.
Step 2: Resting Voltage Test (5 Minutes)
This tells you the battery’s current state of charge.
- Turn off the engine and all electrical accessories, and let the bike sit unused for at least 30 minutes to an hour (ideally overnight) so the reading reflects true resting voltage, not a residual charge from recent riding.
- Set your multimeter to DC voltage, typically the 20V range.
- Connect the red probe to the positive (+) terminal and the black probe to the negative (−) terminal.
- Read the display.

How to Interpret the Reading
| Voltage (Resting) | Battery Condition |
| 12.6V–12.9V | Fully charged, healthy |
| 12.4V–12.6V | Good, roughly 75%+ charged |
| 12.2V–12.4V | Moderately discharged — charge and retest |
| 12.0V–12.2V | Significantly discharged — charge fully before drawing conclusions |
| Below 12.0V | Weak or failing — may still take a charge, but is worth monitoring closely |
| Below 11.5V after a full charge attempt | Likely at end of life — replacement is the practical fix |
A single low reading doesn’t automatically mean the battery is bad — it might just be discharged. The real test is what happens after a full charge, covered in Step 4.
Also read – Best Engine Oil for Bikes in 2026
Step 3: Cranking Voltage Test (Load Test)
This is the more telling test, since a battery can hold resting voltage but still fail to deliver enough current under load.
- Keep the multimeter connected to the terminals as before.
- Have someone press the self-start button while you watch the multimeter (or do it yourself if your bike layout allows it safely).
- Note the lowest voltage reached during cranking.
How to Interpret the Cranking Reading
| Voltage During Cranking | What It Means |
| Stays above 10V | Battery is delivering current well |
| Drops to 9.6V–10V | Borderline — battery is aging but may still be usable short-term |
| Drops below 9.6V | Battery can’t sustain adequate current under load — replacement is likely needed even if resting voltage looked fine |
A battery that reads a healthy 12.5V at rest but collapses to 8V under cranking is a classic sign of internal cell damage — this is exactly why the resting voltage alone isn’t enough to judge battery health.
Step 4: The Full-Charge Retest
If your resting voltage was low, charge the battery fully using an appropriate charger for your battery type (never assume all chargers are interchangeable between standard lead-acid, MF, and lithium batteries — check your battery’s specification first). After a full charge:
- Recheck resting voltage after letting it sit for at least an hour. If it holds above 12.4V, the battery likely just needed charging.
- If it drops back below 12.2V within a few hours of being fully charged, the battery likely can’t hold charge anymore — a sign of internal degradation, not a charging problem.
- Redo the cranking test — if it still collapses under load after a full charge, the battery needs replacement.
Battery Type Matters: Lead-Acid vs MF vs Lithium
| Battery Type | Typical Lifespan | Maintenance Needed |
| Conventional lead-acid | 1.5–2 years | Periodic electrolyte level top-up |
| Maintenance-Free (MF/VRLA) | 2–3 years | None — sealed, no top-up needed |
| Lithium-ion (Li-ion) | 3–5 years | None, but sensitive to deep discharge — avoid letting it fully drain |
Voltage ranges above are a reasonable general guide across types, but lithium batteries in particular can have slightly different resting voltage curves — check your specific battery’s datasheet if you have a lithium replacement fitted, since assuming lead-acid numbers can lead to premature replacement decisions.
Signs Your Battery Health Is Declining (Before It Fails)
- Self-start cranks noticeably slower than it used to, especially on cold mornings
- Headlight visibly dims when you press the horn or turn signal simultaneously
- Bike starts fine on kick but struggles or fails on self-start
- Battery needs charging more frequently than it used to, even with regular riding
- Dashboard lights flicker or dim briefly during cranking
Any one of these on its own isn’t conclusive, but noticing two or more together is a reasonably strong signal that the battery is heading toward replacement, even before it fails outright.
BikeProMech: One Bike, Every City, One Trusted Mechanic
Your bike doesn’t care what city it’s in — but the fixes it needs often do. Monsoon rust in Coimbatore isn’t the same problem as heat-cracked engine oil in Hyderabad or stop-start traffic wear in Bangalore. That’s exactly why BikeProMech built doorstep service that adapts to where you actually ride.
Wherever You Are, We’re Already There
If you’re riding through Bangalore’s daily gridlock, your bike is doing double the work your engine oil is rated for — start with our Bangalore bike service page to see real-time slots near you, or read up on choosing the right engine oil for stop-start traffic before you book.
In Hyderabad, summer heat is brutal on batteries and coolant systems alike. Check our Hyderabad doorstep service page for local mechanics, and if your bike’s been sluggish to start lately, our bike battery health DIY guide will tell you in five minutes whether it’s a battery issue or something bigger.
And if you’re in Coimbatore, where monsoon spells mean tyre grip and rust prevention matter more than anywhere else, our Coimbatore bike service page connects you to mechanics who know the terrain — pair that with our complete 25-point service checklist so nothing gets missed before the rains hit.
Not Just a City Match — The Right Fix, Every Time
Whichever city you’re in, the service you need is one click away:
- Overdue for a checkup? → Periodic Bike Service
- Engine running rough? → Engine Repair
- Battery dying without warning? → Bike Battery Replacement
- Bald tyres before a long ride? → Tyres at Home
- Post-accident dents and repairs? → Accidental Repair
- Stranded on the road right now? → Roadside Assistance
Book Once, Ride Worry-Free All Year
Skip the one-off bookings entirely — our Membership/AMC plans bundle periodic service, priority RSA, and battery checks into one flat annual cost, no matter which of our 20+ cities you’re riding in. Add bike insurance on top, and you’ve covered every failure point your bike could throw at you — mechanical or otherwise.
Ready to stop guessing and start booking? Find your city, book your mechanic, and get back on the road in under an hour.
What Shortens Bike Battery Life
- Long idle periods — a bike left unused for weeks allows the battery to self-discharge below a safe threshold, which accelerates degradation, especially in lead-acid types
- Extreme heat — high ambient temperatures accelerate internal chemical breakdown, which is part of why battery life in India often runs shorter than manufacturer-rated averages for cooler climates
- Deep discharge cycles — repeatedly running the battery down to near-zero before recharging stresses the cells more than shallow, frequent charging
- Corroded terminals left unaddressed — increases resistance, forcing the battery to work harder to deliver the same current
- Aftermarket electrical accessories — device installations that draw power even with the ignition off can slowly drain a battery over days
Also read – Quick Bike Service Checklist
When to Charge vs When to Replace
| Situation | Recommended Action |
| Resting voltage low, but holds a full charge and passes the cranking test afterward | Charge it — the battery is fine |
| Resting voltage recovers after charging but drops again within hours | Replace — battery can’t hold charge |
| Cranking voltage collapses even after a full charge | Replace — insufficient current delivery |
| Visible swelling, cracking, or leakage | Replace immediately, regardless of voltage readings |
| Battery is 2+ years old (lead-acid/MF) and showing any decline signs | Replace proactively — testing an aging battery repeatedly has diminishing value once it’s near its typical lifespan |
For general reference on battery safety handling and disposal, the Central Pollution Control Board’s battery waste management guidelines cover proper disposal, since lead-acid batteries specifically should never be discarded in regular household waste.
Frequently Asked Questions
This is exactly why the cranking (load) test matters more than the resting voltage alone — a battery can hold a static charge but still fail to deliver enough current under the actual load of starting the engine, which points to internal degradation.
Partially — you can look for visual signs (corrosion, swelling, leakage) and behavioral signs (slow cranking, dimming lights, frequent recharging), but you won’t get a precise reading without a multimeter. Given how inexpensive one is, it’s worth having for this and other basic electrical checks.
Typically 1.5–2 years for conventional lead-acid, 2–3 years for maintenance-free (MF) batteries, and 3–5 years for lithium-ion batteries — though heat, riding frequency, and idle periods can shorten this in practice.
Yes, to some extent — all batteries self-discharge slowly over time, and lead-acid types especially can drop below a safe threshold after several weeks of inactivity. If you don’t ride regularly, starting the bike briefly every week or two helps maintain charge.